September 20, 2013

DIY Friday: Ombre Pinecone Tutorial


A few years ago I found two very beautiful pinecones around my neighborhood. I took them home and placed them on my bookcase not knowing that it would spark a love for collecting pinecone from the different places that I have visited within the U.S. I have taken home a foot long pinecone from a campsite at Idyllwild and some tiny pinecones from my trip to Oregon. After collecting a basket full, I started thinking of ways to dress them up. One day I had some paint laying around and decided to add a pop of color to a pinecone by painting just the tips of the pinecone. And the rest was history!

Materials:
- A pinecone
- Acrylic paint in three or four different shade of the same color
- Angled paint brush
- An old toothbrush

Construction:
1. Take your toothbrush and clean off any dirt or bugs (recommend doing this step outdoor).
2. Take your paint brush and apply the first shade on to 1/4 of the pinecone (recommend starting with the darkest shade at the bottom of the pinecone and working your way up).
3. Continue painting the next shade to the next 1/4 of the pinecone.
4. Repeat step 3 with the rest of the shades until you reach the top.

Ombré Pinecone 1 Ombré Pinecone 2 Ombré Pinecone 3

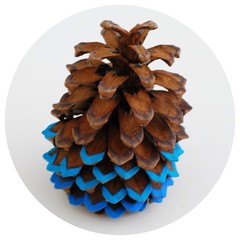
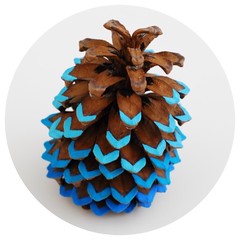
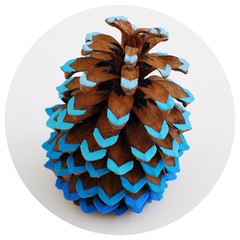
Depending on the size of the pinecone you can either use three shades for a small to medium size pinecone or four different shades for a large size pinecone. This will allow you to clearly see the ombre effect. The simplicity of adding just a bit of color to the tip of the pinecone can really transform it into something that is both vibrant and decorative. I love how the pinecones can add a pop of color to any festive occasions or an otherwise boring room. I have them displayed around my fireplace but next month I plan on using them in my nephew's Cowboy and Indian Theme birthday party. How do you plan on using them to brighten up your home or everyday life?


September 13, 2013

DIY Friday: Painted Oxfords Tutorial


Ever since the spring, I have been in love with Cole Hann's oxfords. However, living on a shoestring budget means that I can't just shell out $130 for a pair of shoes. Instead, I have been looking for a cost effect pair but I have not been lucky until now. While I was at Target, I found a pair of Cherokee oxford in the boy's department. I tried them on and they have a boyish fit to them and I thought that they would look great with a pair of boyfriend fit jeans. I decided to get the shoes for two reasons. First, I knew that I can transform them into something that look similar to my favorite pair of Cole Hann oxfords with a little bit of paint. Second, they were on sale for $12 bucks!
I was not 100% sure how they were gonna turn out. I read online that using acrylic paint on rubber could result in chipping and cracking when worn. But I figured that I had plenty of paint left to touch up any chips or cracks that might occur. The only down side that I've discovered was that acrylic paint leaves behind a lot of strikes. From afar it is not noticeable but upon close inspection you can see them. Next time I might try spray painting it. I would definitely do this project again because I think it would be adorable to add a pop of color to my little nephew's shoes. Overall, this diy is easy peasy!

Materials:
- A pair of oxfords
- DecoArt outdoor patio paint in Fiesta Yellow
- Angle oil painting brush

Construction:
1. Take your paint brush and paint the first coat.
2. Let it dry for a few minutes before applying another coat.
3. Apply 3-4 coats in order to capture the vibrancy.

DIY Painted Oxfords Painted Oxford

September 6, 2013

DIY Friday: Bento Box Cheese Tray Tutorial


A few weeks ago Pippa Armbrester, a contributor at Buzzfeed, asked me to create a DIY project for Buzzfeed. She requested a DIY cheese board that looks fresh, fun, and modern. I was pretty excited about the whole thing until I realized that it was harder than I expected. Since I can't come up with any unique ideas, I was worried that I might have to pass up the opportunity to be featured on Buzzfeed. Not ready to throw in the towel, I wonder the wood aisles at my local craft store and came upon a wooden memory tray. The first thought that came into my head was a bento box, so I decided to do a bento box inspired cheese tray where the cheese, salami, crackers, and olives each have their own individual compartments. Since most bento box has an array of colors, I decided to throw in a few pop of colors and a geometric shape to modernize it.

Materials:
- Memory tray

- DecoArt outdoor patio paint in Fiesta Yellow, Blue Bahama and Coral Sunset
- Zinsser's Shellac spray
- Angle oil painting brush
- Small piece of 150 grit fine sandpaper
- A piece of newspaper
- A straight edge and pencil

Construction:
1. Using your straight end and pencil, draw a diagonal line inside each square.
2. Apply the paint to each of the triangles and the inner side panels that the triangle is touching. Apply 2-3 coat of each color in order to capture the vibrancy.
3. Using your sandpaper, sand off any paint stains that you’ve left behind. Then clean off any sand that is left on the surface so it’s ready for shellac.
4. Spread out the newspaper and place the tray in the center. Take the shellac and apply as directed. Let it dry for a few hours before you start serving.

I would like to point out two things. First, shellac will shield the tray from water but it’s not waterproof, so wipe clean once you are done using the tray. Second, the geometric pattern that I used was a 90 degree triangle in each square combine with the following paint pattern. Starting with the triangle in the top left square, follow this pattern: Top Row: Blue Bahama —> Coral Sunset —> Fiesta Yellow. Middle Row: Coral Sunset —> Blue Bahama —> Coral Sunset. Bottom Row: Fiesta Yellow —> Coral Sunset —> Blue Bahama. You can also create your own pattern. The possibilities are endless when you start mixing shapes and colors. I was surprised by how well this project turned out and super excited to see that my picture was used for the thumbnail on the "5 Gorgeous DIY Cheese Boards To Impress Your Guests".

Bento Box Cheese Tray 1Bento Box Cheese Tray 2Bento Box Cheese Tray

August 2, 2013

DIY Friday: Growing Moon Cactus Tutorial


Last weekend while I was at my local garden shop I came upon some beautiful cactus. One thing that I love about summer is having the opportunity to find a variety of unique succulents and cactus. I've learned from the past to shop for succulents or cactus in the summer time because they are less expensive in the summer, there is a larger variety to choose from, and some garden might only carry them that time a year.
A few months ago, I found a photo on Pinterest of a beautiful arrangement of cactus. The photo was pinned from a blog in the Netherlands called From Ezter with Love. From the blog post, Esther showed how cactus were not just prickly boring plants. Instead, she showcased them as vibrant plants that can brighten up any surrounding. The colorful cactus that she focus on were the moon cactus, also know as grafted cactus because their colorful Gymnocalycium mihanovichii top is propagated or "grafted" on to a healthy Hylocereus body. I was so excited when I finally found the moon cactus at my local garden shop because now I can recreate Ester's cactus arrangement, but with a twist of my own.

General Materials:
- Moon cactus 2.5" (Gymnocalycium mihanovichii)
- Clay pots 2.5"
- Cactus potting mix
- Patio paint outdoor by DecoArt in Blue Bahama color
- Blue painter's tape
- Flat head paint brush
- Gardening gloves

Construction:
1. Tape the clay pot with a pattern of your choice and start painting.
2. Take off the tape as soon as you are done painting and allow the to paint dry.
3. Add some cactus potting mix to the bottom of the pot.
4. Put on your gardening glove before handing the moon cactus. Carefully take the cactus from its container and place it in the pot and add cactus potting mix.
5. Keep cactus indoor in indirect sunlight and water thoroughly, then let the plant dry out between waterings.

Since I do not have space in my kitchen to displace a large planter, like Ester, I decided to plant the cacti in individual terra cotta clay pots. There are two benefits of planting them in individual terra cotta pots. First, it allows me to easily place them anywhere throughout the house. I am currently displaying mine on my bathroom counter and ever morning they cheer me up with there pop of color. Second, I can customize each pot with any color and design that I like, with the right paint. I choose a turquoise paint because I love how it enhances the vibrant color of the moon cactus. They will serve as great decorative centerpieces for any festive occasion. So brighten up the rest of your summer with these colorful cactus!

Growing Moon CactusGrowing Moon CactusGrow Moon Cactus

May 24, 2013

DIY Friday: Upcycled Magazine Stool Tutorial


I have been doing some spring cleaning. Mainly clearing out the garage to convert it into a workshop where I can fix up old pieces of furniture and possibly build new pieces in my spare time. From the cleaning process, I discovered that I am quite a hoarder of some useless and mundane stuff. Case in point, a stack of Teen Vogue and Vogue magazines from 2003 to 2006. They have been spared after a move with the hope that one day I will get the chance to sit down and enjoy them but time has passed me by and so what am I going to do with them now?
Recently, I have been fascinated with a process called upcycling, where old useless products gets converted into new useful products. Being someone who likes transforming trash into treasure, I thought this is a great opportunity for me to save my magazines from the recycler by putting it to some use. But what purpose would they serve? After thinking it over for a few days, I remember coming across Sut Kutusu's Hockenheimer and was inspired to recreate it.

Magazine StoolGeneral Materials:
- A stack of magazines
- Leather belt
- Screws driver

Materials from Home Depot:
- 1 Hardwood Plywood Panel (15/32" 23.75"x47.75")
- 4 Rubber Wheel Rigid Casters (2")
- 2 bags of Screws (#10x1/2")

Construction:
1. At Home Depot you can get the plywood cut to the size of your magazine for free (bring the magazine or the measurements).
2. At home, carefully screw on the caster plate to each corner of the cut plywood.
3. Stack the magazines on top of the plywood and strap them down tightly with the belt.
4. Take it for a test drive to make sure the magazines are securely tighten and the wheels are working properly.
5. You can strap a custom made pillow to the top for more comfort, but its optional.


Magazine Stool
Magazine Stool Since each stool weighs at least 20 pounds, I decided to put them on wheels so that I can easily transport them around the garage. I also found some beautiful leather belts that I have not worn in years and decided to use them in this project because I think they add a masculine feel while tightly holding all of the magazines together. As a result, I was able to create some beautiful stools from reusing what I had laying around the house. Overall, the project ended up costing me about $25 per stool. I want to conclude by reflecting on what I have learned from this project and provide you with some useful tips. First, if you don't mind the extra weight, go with a thicker plywood panel for extra support. Second, the swivel casters will allow you a wider range of motion, in ever directions, as a posed to the ones that only enable you to move back and forth.
I thought they would be a great addition to my workshop as a sitting stool for when I have to kneel, bend, and squat to fix, sand, and paint the furniture pieces. But I have discovered that they make a great foot rest, a table for my laptop when I'm sitting on the floor, or a great decorative piece as a magazines holder/transporter as well.

May 10, 2013

DIY Friday: Growing Paperwhites Indoor Tutorial


While in the process of leveling out the backyard to put in some raised vegetable beds, I excavated about two dozens wild paperwhite bulbs. They have been there since we've moved in and every winter they greet us with their tiny white flowers and long green stems. Feeling bad for evicting them, I did some research and discovered that the bulbs can be force indoor. Forcing bulbs indoor basically means growing the bulbs indoor in water or soil. Since I have never grown bulbs in water before, I'm excited to try it out!

Materials:
- Paperwhite bulbs
- Glass container
- Chicken wire
- River rocks

Construction:
1. Filled half of the container with the river rocks. 
2. Carefully cut out a piece of chicken wire and fold it over the top of the container. Leave a 1 inch margin around the chicken wire so that you can fold it over the container, creating a cap.
3. Place the bulbs on top of each hexagon on the chicken wire so that the roots dangle down into the container.
4. Add enough water so the roots are submerged in the water but the bulbs are not sitting in water.

References:
- Southern Living: Your Guide to Paperwhites
- Apartment Therapy: How to Grow Paperwhites
- Camille Style: Paperwhites Centerpiece

So I started by following the instructions provided in the references (above) but quickly faced an obstacle. Growing bulbs in water is harder than it looks! After placing a few bulbs in rocks and water to grow, I noticed that the body of the bulbs were absorbing a lot of water very quickly. I took the wet bulbs out and discovered that a few have rotted through. From my observation, I discovered that the bulbs should not be sit in water because it would just absorbed the water and end up rotting. I came up with a solution by building my own setup where only the roots would be submerge in the water. Using chicken wire, I suspended the bulbs above the water so that only the roots touches the water and the body remain dry. I love how the chicken wire adds an architectural element while serving as an important structural support tool. With this new setup, I hope the bulbs are able to survive the summer season and bloom again.

PaperwhitesPaper whitesGrowing Paperwhites

May 3, 2013

DIY Friday: Blog Design Tutorial (part. 1)


I started a blog a year ago called Grace and Emerald, after a few posts I got bored talking about myself. Since I did not know much about coding at the time, I was not able to design and dress up my blog. At that point, I decided to take some time off from blogging and teach myself the basic HTML and CSS codes that were needed to jump start my hobby. After figuring out what I wanted to blog about and combining that with my newfound knowledge, I was able to create a website that I can be proud of.
I started with the basic free Blogger account for my first blog but for my second blog I decided to buy my domain name for 10 bucks a year through Blogger. Having my own domain name basically means that .Blogspot gets dropped so that WhimZeeCal.Blogspot.com becomes WhimZeeCal.com. I still use Blogger's Simple Template as a foundation for my site and after customizing the codes to my liking, I am able to make the template my own. During the customizing process I did a lot of research and found some helpful tips and tutorials from other bloggers. I would like to pass along what I have found to anyone who is not tech-savvy but have enough patient and motivation to design their own blog.

News:
Buy a custom domain through Blogger
Blogger template HTML editor

Removing:
Navbar at the top of the page
Border and box shadow around the images
Dashed and dotted line in the footer
Subscribe to: Posts (Atom) link in the footer

Customizing:
Post header
Post divider
Newer and older posts link in the footer
Social media icons
Share This buttons

Centering:
Post tab
Post footer

Before jumping in and making all of these changes to your blog make sure to back up your Blogger template so that you still have a foundation to go back to just in case your make a mistake with your codes. Recently Blogger updated their HTML editor with a more sophisticated and user friendly text editor which include line numbers and color coding. Make sure you familiarize yourself with the new features before you start because it will make everything a lot easier and more organized. After tackling all of these different components you will have a better understanding of how your site is laid out. If you want to learn more about coding you can checkout W3Schools, which is a great reference for codes, and Codecademy, which teaches you basic coding for free! I use both of these sites on a regular bases and I am a big support of empowering more girls to learn how to code. So if you have any questions or would like to share the site that you have created feel free to leave me a comment. I would love to hear from you. I will be working on more tips and tutorial to dress up your site so stay tune for part two.

April 5, 2013

DIY Friday: Tin Can Planter Tutorial

I am always looking for unique one-of-a-kind containers to display my succulents. After trying out different kind of containers, I have discovered that a simple soup can makes a suitable environment for growing succulents and it will give your garden that country rustic feel. The plus side to re-using your soup can also include the good feeling you get for being environmentally conscious, you can easily poke some holes at the bottom of the can for drainage, it is inexpensive and you'll get a meal from it. The planting process is real simple, all you have to do is eat the soup, save the can, just add dirt, some succulents, and water!
If you like the polished look then leave the can indoor on the window sill or apply a coat of rust resistant paint before putting it outdoor. If you like the rustic look then leave the can outdoor and it will weather overtime. After planting a few cans with succulents, herbs or wildflowers, you can start dressing up your garden by placing them on your patio table or hanging a few from the gazebo. They also make great centerpieces for a rustic style wedding if you mix up the size of the cans with different type of plants and flowers. Let me know if you have tried it out this weekend. I woud love to see what you have planted!

Materials:
Soup Can
- Succulents
- Hammer and Screw Driver
- Potting Soil

Construction:
1. Rinse out the can and take off the label.
2. Take the hammer and screw driver and hammer in three holes at the bottom of the can for drainage. 
3. Add potting soil to 50% of the can.
4. Add the plant and it's soil to the rest of the can. Don't forget to water so that the soils married with each other.

Tin Can PlanterTin Can PlanterTin Can Planter

March 29, 2013

DIY Friday: Knitted Leg Warmers Tutorial

I knitted these leg warmers for my nephew, Zach. For the first few months, Zach lived mainly in onesie but when winter came we had to put pants on him because it was getting cold. It was a love and hate relationship with the pants. We loved all of the different types of pants out there for a 3 months old baby. However, once we put the pants on him, they were bulky looking and the elastic band was not very forgiving. My sister did some research and found out that there was a comfortable alternative to wearing pants...baby leg warmers!

Knitted Leg Warmer

Materials:

- One ball of Bernat Softee Baby (color Grey Marl)
- A set of US #6 double pointed needles (set of 5)

Measure:

Circumference (~7 inches) and length (~8 inches) of baby's leg.

Gauge:

6 stitch = 1 inch in stockinette stitch 

Calculation:

6 stitches x 7 inches = 42 stitches
(Note: subtract 2 stitches because the legging will stretch and working in the round among four needles will put 10 stitch on each needle)

Pattern:

1. Cast on 40 sts.
2. Knit in the round with double pointed needles until desire length.
3. Bind off and weave in ends
(Note: measurements is for baby 3-6 months old)

My sister likes the leg warmer because it won't hurt his tummy. I like the leg warmers because we live in Southern California and it is a great laying piece, easy to take on and off based on the changing weather. I came up with this easy pattern, which you can finish within a weekend based on your knitting skills. You can also make them as warm or cool as you like based on the type of yarn you choose. Let me know if you have tried out this pattern. I would love to see what you have made!

Knitted Leg WarmersKnitted Leg WarmersKnitted Leg Warmers