

A few years ago I found two very beautiful pinecones around my neighborhood. I took them home and placed them on my bookcase not knowing that it would spark a love for collecting pinecone from the different places that I have visited within the U.S. I have taken home a foot long pinecone from a campsite at Idyllwild and some tiny pinecones from my trip to Oregon. After collecting a basket full, I started thinking of ways to dress them up. One day I had some paint laying around and decided to add a pop of color to a pinecone by painting just the tips of the pinecone. And the rest was history!
Materials:
1. Take your toothbrush and clean off any dirt or bugs (recommend doing this step outdoor).
- A pinecone
- Acrylic paint in three or four different shade of the same color
- Angled paint brush
- An old toothbrush
Construction:
- Acrylic paint in three or four different shade of the same color
- Angled paint brush
- An old toothbrush
Construction:
2. Take your paint brush and apply the first shade on to 1/4 of the pinecone (recommend starting with the darkest shade at the bottom of the pinecone and working your way up).
3. Continue painting the next shade to the next 1/4 of the pinecone.
4. Repeat step 3 with the rest of the shades until you reach the top.
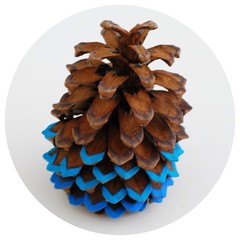
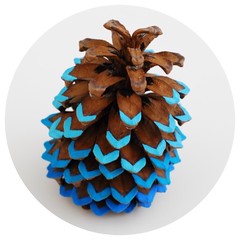
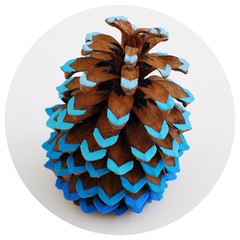
Depending on the size of the pinecone you can either use three shades for a small to medium size pinecone or four different shades for a large size pinecone. This will allow you to clearly see the ombre effect. The simplicity of adding just a bit of color to the tip of the pinecone can really transform it into something that is both vibrant and decorative. I love how the pinecones can add a pop of color to any festive occasions or an otherwise boring room. I have them displayed around my fireplace but next month I plan on using them in my nephew's Cowboy and Indian Theme birthday party. How do you plan on using them to brighten up your home or everyday life?


One word!
ReplyDeleteFabulous!
I wish I could get my hands on some pine cones tooo!
http://moonshineandsunlight.blogspot.in/
Thanks! so happy that you like them. If you can't find any pinecone around your area, I know that Michael's or some arts and craft store do sell them (especially around this time of year for Christmas). Make sure you get a bag that has full bloom pinecones so that it is easier to paint. Good Luck!
DeleteJust a handy FIY: If the pinecones aren't fully open you can try to put them in the oven at a moderately low temp and they should bloom as they fully dry. My son and I collect pinecones on our nature walks and I have been looking for something to do with them. This is fabulous! Thank You!
DeleteMake sure you put any pinecones you plan to use, on aluminum foil then put them in oven on low temperature to make sure you get rid of any/all sap.
DeleteThat looks so cute. I am taking down my Christmas decorations today and this would be an awesome edition to my decor.I Have plenty of pinecones behind my house ,so I really want to try this craft.
DeleteSo beauutifull !
ReplyDeletehow clever! these cones look amazing! I have plenty of pine cones, I will definitly try to make some!
ReplyDeletep.s. if your cones are not quite "open", put them near stove or any other heat, they will "bloom" soon enough ;)
Sticking them in the oven in a great idea! I have left them out in the sun to dry once after forgetting about them in the rain. But popping them in the oven is a much faster method, lets just hope I don't burn them!
ReplyDeleteit also kills the little bugs inside of them.
ReplyDeletevery beautiful!!! Good
ReplyDeleteSo beautiful! I love it!
ReplyDeleteLovely Greets
Christin
I love love love this idea!! My husband just brought home a bucket of pine cones and I have to try this. Thanks !!
ReplyDeleteDas ist ja mal eine gute Idee .Das sieht richtig toll aus.Ich werde gleich morgen in den Wald gehen und Tannenzapfen suchen.
ReplyDeleteHi Grace,
ReplyDeleteWhat a cute project! I love it so much that I decided to feature it in our roundup of pinecone crafts! Check it out here: http://www.favecraftsblog.com/pinecone-crafts/
Have a great day!
Hi Julia,
DeleteThank you for the feature. I am so happy that you like them.
Cheer!
Hi
ReplyDeleteI tried your pattern and published the result on my blog with a link to your website.
If you like to check out:
http://lanathewoolydog.wordpress.com/
Greets
Marli
Hi Marli,
DeleteThanks for linking back. Love the choice of colors that you picked out. They look great!
Cheers!
Grace
Wish you would have shown the brush used and pictures of also how you painted such perfect and consistent edges.
ReplyDeleteSorry about that. I used an angled paint brush, the kind that you use for oil or watercolor. And in order to get a consistent edge, I recommend painting at least two coats but three is the best.
DeleteLOve the ombre effect. I collected pine cones to tip paint (dipping in paint to messy) with Nursing home residents but this would be even nicer as a christmas or fall craft. Thanks for the imrovrd idea.
ReplyDeleteBeautiful and inspirational!
ReplyDeletePinned!
K-
pinecones are so special to me because my grandma planted one years and years ago. every time i see it, i am reminded of her sweet spirit. i will be making these cute ombre pinecones over the weekend. thank you for sharing this!
ReplyDeleteThese look beautiful! What a great idea
ReplyDeletepolaroidsandpuds.blogspot.co.uk
Pinecones are great.I include them in my holiday decoration every year and they look great always.
ReplyDeleteFabulous idea!
ReplyDeleteI found your tutorial via the Mollie Makes moodboard:
https://www.facebook.com/events/226485050856025/227593110745219/?ref=notif¬if_t=plan_mall_activity
These are really pretty. I used to do something similar with glitter glue pens, it made for a nice little Christmas decoration.
ReplyDeleteThese are beautiful, great idea! I can see them done with gold, silver and white for Christmas! :-)
ReplyDeleteLove the colors!! I have big 10 inch pinecones in my new yard, this will be a nice way to dress them up.
ReplyDeleteLove the ombré look! Just beautiful!
ReplyDeletepretty! ;)
ReplyDeleteSUUUUPER pretty!
ReplyDeleteThese are so pretty, they would make great decorations around the home. Please share with me on my monthly #Trash2Treasure link up
ReplyDeleteLove them! Really want to make these with my toddler.
ReplyDeleteLove this! Would love to feature you and this DIY Tutorial in an upcoming month. We'll be in touch.
ReplyDeleteNice!
ReplyDeleteWe were so inspired by your post that we added it to the 23 Best DIY Fall Craft Ideas list at Craftcuts.com! Thank you for inspiring us for this Fall holiday season! Keep up the great work.
ReplyDeleteYou can check out our post here: https://www.craftcuts.com/community/home-decor/diy-fall-craft-ideas/
these are really cute, i might have to add these to my seasonal decorations
ReplyDeletecomment brought to you by: concrete Billings MT