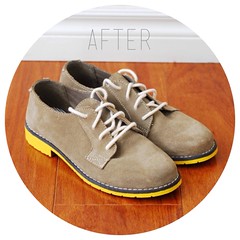
Ever since the spring, I have been in love with Cole Hann's oxfords. However, living on a shoestring budget means that I can't just shell out $130 for a pair of shoes. Instead, I have been looking for a cost effect pair but I have not been lucky until now. While I was at Target, I found a pair of Cherokee oxford in the boy's department. I tried them on and they have a boyish fit to them and I thought that they would look great with a pair of boyfriend fit jeans. I decided to get the shoes for two reasons. First, I knew that I can transform them into something that look similar to my favorite pair of Cole Hann oxfords with a little bit of paint. Second, they were on sale for $12 bucks!
I was not 100% sure how they were gonna turn out. I read online that using acrylic paint on rubber could result in chipping and cracking when worn. But I figured that I had plenty of paint left to touch up any chips or cracks that might occur. The only down side that I've discovered was that acrylic paint leaves behind a lot of strikes. From afar it is not noticeable but upon close inspection you can see them. Next time I might try spray painting it. I would definitely do this project again because I think it would be adorable to add a pop of color to my little nephew's shoes. Overall, this diy is easy peasy!
Materials:
1. Take your paint brush and paint the first coat.
- A pair of oxfords
- DecoArt outdoor patio paint in Fiesta Yellow
- Angle oil painting brush
Construction:
- DecoArt outdoor patio paint in Fiesta Yellow
- Angle oil painting brush
Construction:
2. Let it dry for a few minutes before applying another coat.
3. Apply 3-4 coats in order to capture the vibrancy.


No comments:
Post a Comment